Proxy Media in Final Cut Pro X
Published on December 15, 2014
 If Final Cut Pro X proxy clips aren't familiar to you, I hope this will help...
Because I like to keep things interesting, let's start with a quote. William Shakespeare wrote,
"The course of true love never did run smooth."
Maybe that's correct about true love, but you know what else is known for not running smooth?
Video projects on old computers.
If you want your video project to play smoothly, proxy video clips just might be the solution you're looking for.
Why should you use proxy clips in Final Cut Pro X?
First, we need to talk about what proxy clips are.
They're basically low quality, low resolution versions of the video clips you're already working with.
Because proxy clips are low quality and low resolution, their files sizes are small. They're lightweight. The result is that they play back easily on laptops and older computers.
If you're working on a video project, and it stutters or skips frames when you play it back, you might find that using proxy clips instead of the original clips will help smooth things out.
Many of us can't reasonably expect to get a new computer as often as we'd like, so we might find ourselves using proxy clips as our computers get older.
On the other hand, you might never need to use proxy clips in Final Cut Pro X at all. If your original video plays back smoothly -- without skipping frames, without stutters -- there's no need for proxy clips. Making them would be a waste of time in this case.
Once you know what proxy clips are, the next question is, "How do you make them in Final Cut Pro X?"
How to create proxy clips in Final Cut Pro X.
You can make proxy clips when you're importing video into Final Cut Pro X if you already know you'll need them. This can be a nice time-saver, because sometimes when we have a big import, we'll start it before we go to bed and find all our clips happily sitting in the browser when we wake up the next morning.
If you're doing one of these overnight imports and you think you might need proxies, you might as well have them made while you sleep.
Here's how you do it:
- When you see the Import window, all you have to do is check the box that says "Create Proxy Media". It's in the "Transcoding Section".
- Fill out everything else in the window, and click "Import".

But let's say you didn't make proxy clips during the import. Is it too late now? Are you doomed to deal with stuttering playback and dropped frames?
No, everything is going to be just fine. You can make proxy media in the browser at any time. This is how:
- Select the clips that need proxies in the browser (this can be one clip or many).
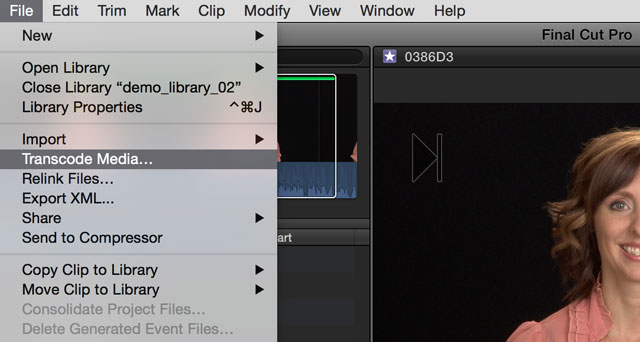
- Right-click (or control-click) on the selected clips and choose "Transcode Media".
- Check the box next to "Create Proxy Media", then click "OK".
(You can monitor the progress in the "Background Tasks" window if you're interested -- you know, if that's your thing.)

Finally, you might find yourself in the "Info Inspector", studying the details of a certain clip.
You can also make a proxy version of your video clip in the Info Inspector. Here's how:
- Select the clip in the browser
- Open the "Info Inspector" and scroll down to the bottom area labeled "File Information".
- Where it says "Available Media Representations", if there's not already a proxy version of a clip, you'll see a button that says "Generate Proxy".
(Side note -- "Generate Proxy" -- that would make a great band name. Go ahead and use it if you want. That's a freebie.)

Well, now that you have all the proxy media you want in Final Cut Pro X, how do you use it?
How to use proxy clips when you're editing in Final Cut Pro X.
This part is simple. It's literally one step.
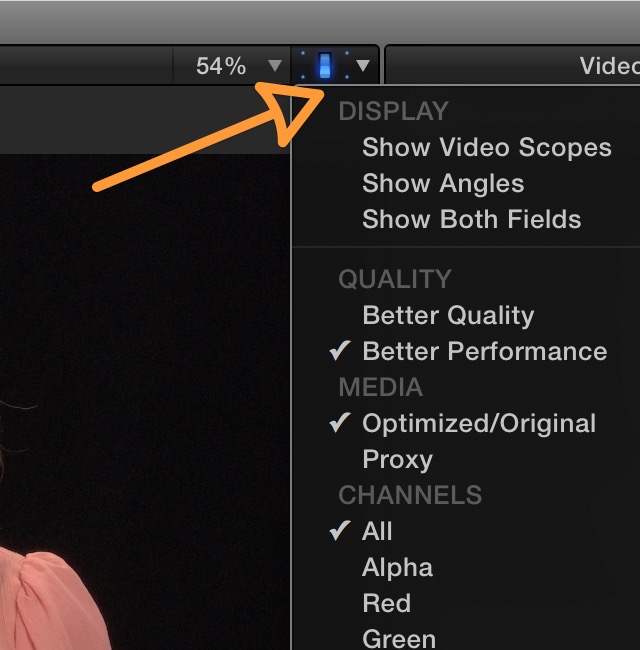
- Click on the "Viewer Options" pop-up menu and select "Proxy" in the Media section.
(Okay, reading that sentence, I see it's actually two steps. My bad.)
Once you've switched the media type to proxy, you might notice a change in the quality of your image in the viewer.
If you're one of those people with a highly-trained eye who is mortally offended by low quality images -- well, you might find yourself getting thoroughly disgusted by the nasty image quality in the Viewer. Sorry about that, but...
Keep in mind that this is only a temporary solution. No need to get worried that your final video will look like that. You're just using the proxy versions while you edit the video.
Once the video is done, you'll get your full quality back.
(Another side note -- "Full Quality Back" -- good name for a feature film.)
How to export the full quality version of your video
The easiest way to ensure you get full quality is to use the Viewer Options pop-up menu and switch the media back to "Optimized/Original".Once you do that, you're magically working with high quality video again (assuming the original media was high quality to begin with. Was it? Did you pay attention to lighting, composition, and audio?)
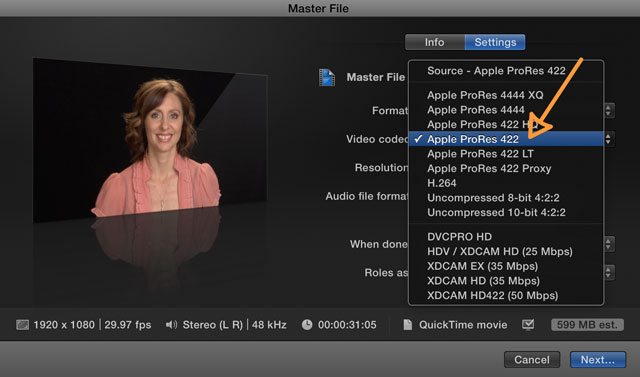
To double-check though, when you share a "Master File", make sure you take a moment to look at the "Settings" pane.
For the video codec, you want it to say "Apple ProRes 422" at least. If it says "Apple ProRes 422 Proxy", well you have problem. Switch it back. Otherwise you could spend hours exporting the video only to discover it's a low quality proxy version of your project. Ugh.
(I'm not saying that it's happened to me. But if it had, it would be so painful I wouldn't want to talk about it.)
How to delete proxy media you no longer need
Okay, the good news is that you've finished your project and you've exported a master version of the video file.
The bad news is that you're using a lot of hard drive space to store those proxy video clips, and you might never need them again.
No sense in that. Let's delete the proxy files now that we're done with our project. Here's how:
- Select the Project, Event, or Library (depending on the proxy clips you want to delete)
- Then in the File Menu, select "Delete Generated Library Files" (or whichever container you chose).
- Then check the box next to "Delete Proxy Media" and click "OK". Keep in mind that this is not something you can undo. If you want the proxies back, you'll have to generate them from scratch again.
(By the way, deleting proxies is a good step to take before you archive a project.)
Conclusion
Proxy files in Final Cut Pro X aren't just important -- if you're using an older computer, they're a way of life.If you start to see stuttering, dropped frames, or slow playback at all, try using proxy media to see if that smooths things out for you.
Might as well try...That's what they're designed for.
This article was last updated on October 6, 2020
Search

Download a free collection of 35 templates for Final Cut Pro.
Yes, they're really free, even for commercial purposes. Click the link below to get started:
Get Started
Popular Resources